马上注册,结交更多好友,享用更多功能,让你轻松玩转社区。
您需要 登录 才可以下载或查看,没有帐号?立即注册

x
本帖最后由 eagle56 于 2017-5-24 14:08 编辑
最近发写关于富斯9和opentx的帖子,也算不上教程,只是使用心得罢了,里面提到了富斯9改线后使用frsky、4合1高频头显示回传数据,其实原来也有模友发过改线的帖子,但是看github有部分内容更新,就把国外的改线教程翻译了,以便模友学习。以下是原贴地址:
https://oscarliang.com/turnigy-9x-advance-mod/
------------------------------------------------------------------------以下正文------------------------------------------------------------------------------
FrSky Telemetry This mod adds the ability to display FrSky telemetryvalues on the 9x transmitter when using the er9X firmware. 这个MOD,让TH9X遥控器在使用er9X固件时,增加显示frsky遥测值功能。 THIS IS NOT A SIMPLE MOD! It involves cutting circuitboard traces and soldering very tiny wires directly onto very tiny processorpins. If you’re not experienced with circuit boards or don’t have a SMALLtipped soldering iron, look at the 9x TelemetrEZ board instead and save yourself alot of trouble. 本MOD(modification “改造,修改”的意思)不是一个简单的改动,包括PCB板切线,在芯片针脚上直接锡焊连接线,如果没有足够的PCB切线经验和小焊点焊接经验,请移步购买 9x TelemetrEZ本教程不使用RS232电平转换器,你也可以使用基于RS232电平转换器的MOD The mod itself has 2 steps: 总得来说,本MOD分两步: - Reroute 2 switches to different pins on the processor
将两个开关信号线改到主控芯片的另外两个针脚上。 - Connect the telemetry data circuits from the module into the 9x. There are several methods to achieve this. This method utilizes 2 unused pins on the module connector to transmit telemetry data to the 9x transmitter, which still allows the use of other modules. Note that the 2 pins used will have to be isolated in any other modules used to be safe.
将高频头的两根遥测信号接入到9X遥控器上。这一步可以通过很多方式实现,本MOD使用高频头上两个没有使用的针脚将遥测数据接入到9X遥控器, 如遥控器还要使用其他高频头,为安全起见,在使用其他高频头之前,请将这两个针脚的连线断开,以便隔离。 NOTE: When doing the Telemetry Mod, keep in mind that if you do the mod ona stock 9x transmitter BEFORE flashing it, when you connect to the TX (or evenpower it up) it will give a constant “Switch Error!” alarm. DON’T PANIC! TheOEM firmware expects a “closed” circuit on each switch during POST, and willtrigger that alarm BECAUSE we’ve cut the traces to pin 41 & 42. Theer9x/open9x Telemetry version firmware resolves this issue. 注意:用本MOD 方法改线后,如果9x遥控器使用原有固件,当你开机是会永远提示有两个开关没有复位。刷了支持遥测版本的er9x或者opentx固件后就可以解决这问题。 Required for this mod: 改造材料准备: - 2 x 200 (or 220) ohm resistors
200欧(或220欧)电阻,2个 470欧电阻 - 150mm / 6″ thin (30-32 AWG) wire, preferably in different colors
150mm长的导线(30-32AWG),最好不同颜色。 - A small plug can be helpful to disconnect the telemetry connections, like a 2 position micro JST.
一套2针接头(公母)。例如JST接头 - Thin heat shrink tubing to cover solder joints
细热缩管,和导线匹配。 - A SMALL tip for your soldering iron, e.g. 1/32″ (0.8mm) or even smaller
尖头烙铁,最好<0.8mm直径。 Rerouting switches 开关通道改线 The first part of this mod frees up the RXD and TXDspecial-purpose pins (2 & 3) on the ATmega64 processor that are used forsimple switch inputs from the Throttle Cut & Aileron Dual-Rate switches. Theswitches are moved to pins 41 (PC6) & 42 (PC7). 第一步,先将与主控芯片连接的THR和AIL开关,从第2、3 针脚,改到41、42针脚。 There are 2 methods of doing this: 可以使用以下两种方法: METHOD 1 方法1 This method involves removing 2 SMD resistors thenconnecting this area to pins 41 & 42 on the ATmega64 processor via 2 x 220Ohm resistors. 去掉下图所示的两个电阻(220欧)。 We start by removing 2 SMD resistors as shown:
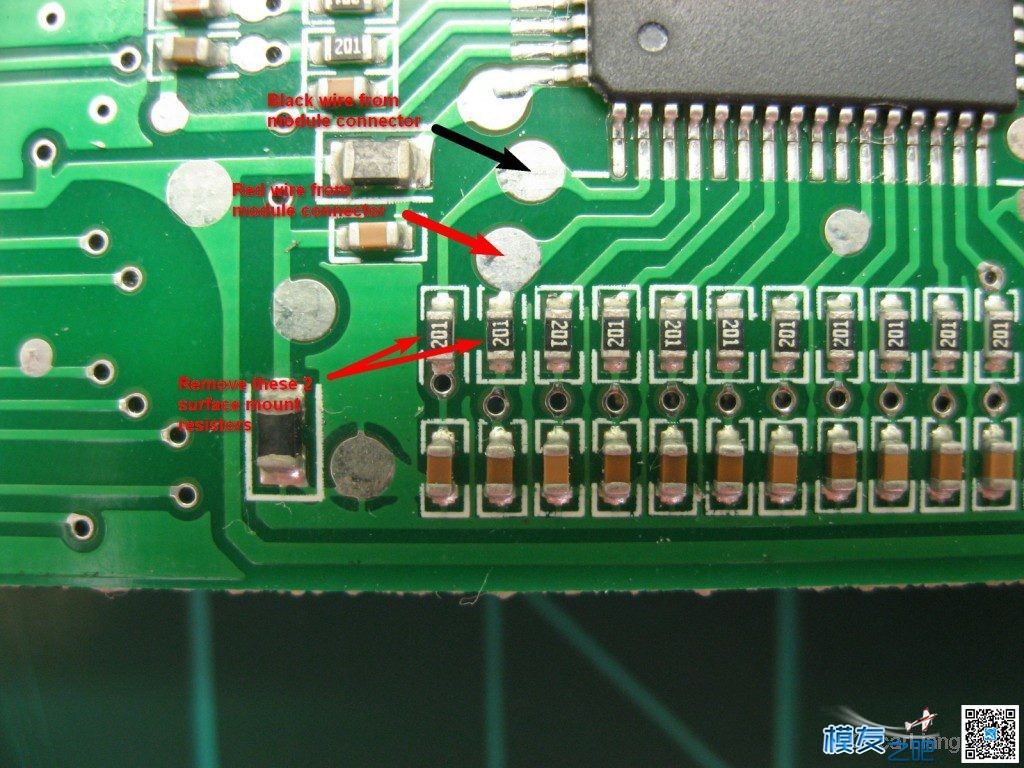
Next connect pins 41 & 42 to where the SMD resistorswere removed via 220 Ohm resistors. Use really fine single strand wire, forexample the 36AWG teflon coated wire HobbyKing sells, or fine PVC insulatedwire. The pins on the ATmega64 are delicate! Tin the wire & the pin, holdthe wire on the pin, then touch a fine point soldering iron onto the joint.Don’t pull up on the wire, rather pull gently in the direction of the pin totest the joint. This is also a good time to connect the wire for the haptic modto pin 43: 【译者:这段就不翻译了,没太大用,我自己给大家说明下吧,芯片考上一侧,从右边数第一个针脚为33号,最左侧为48号,找到41号和42号,焊接两根线(图中黑线和红线),主要焊接要很小心,很考焊接技术。<图中最左侧棕色线不在本MOD涉及的内容范围内,那个是改语音提示用的>】
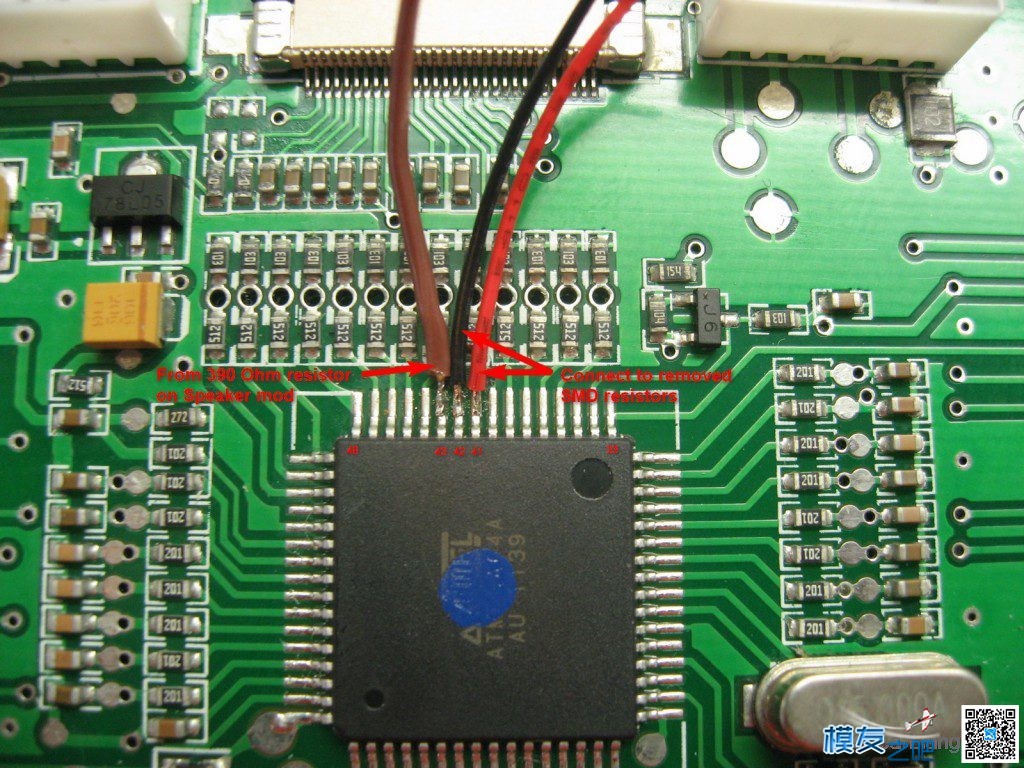
Locate the soldering points for the wires where the SMDresistors were removed:
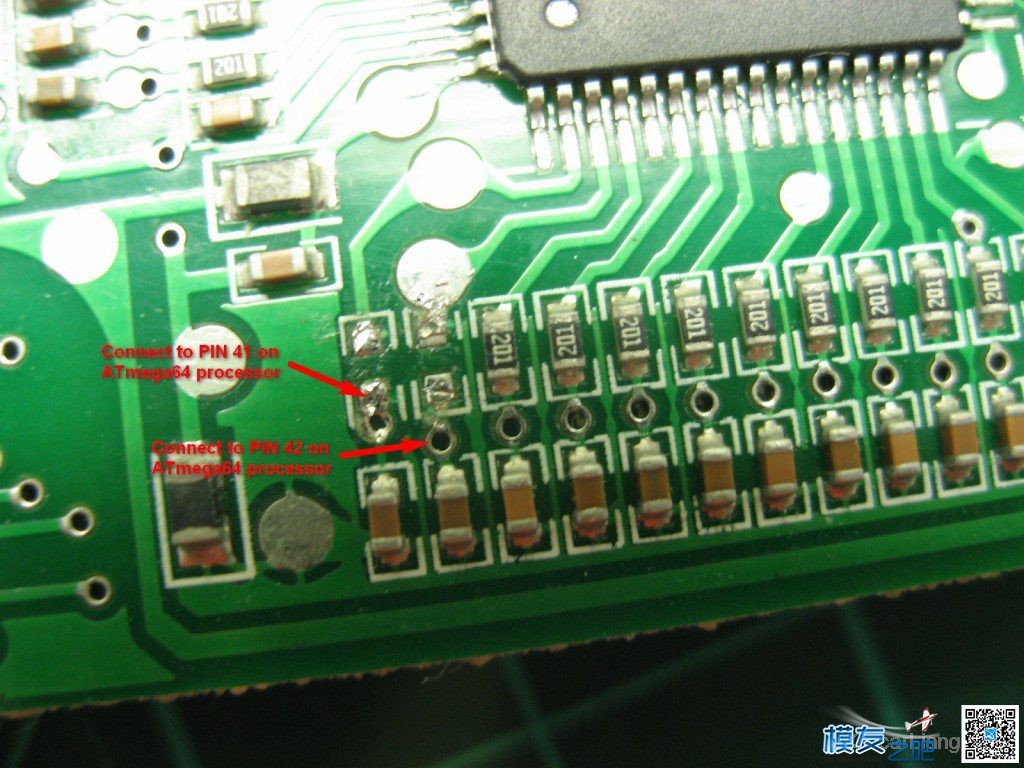
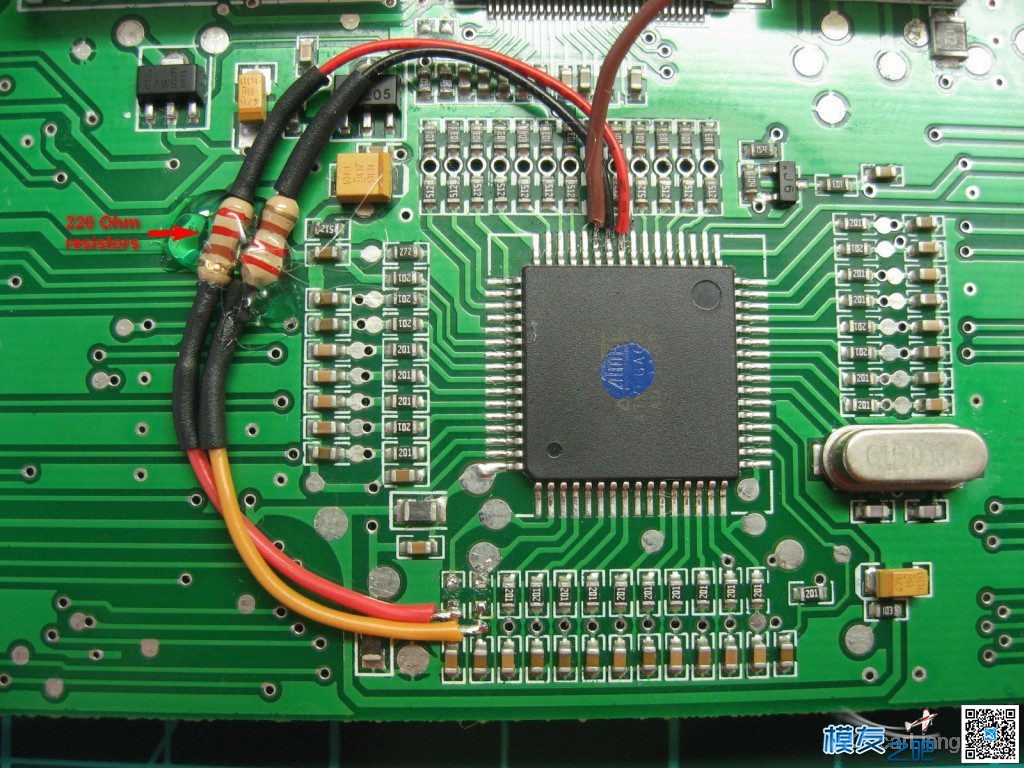
- Hot glue 2 x 220 Ohm resistors to the main PCB and connect one side to the wires soldered to pins 41 & 42.
- Connect the other side of the resistor to where the SMD resistors were removed as identified above. Note which SMD resistor location connects to which pin.
【译者:刚才连接出来的线,分别串接200欧(或者220欧)电阻后焊接到下图位置,接头用热缩管绝缘,电阻用热熔胶或者胶带固定,。注意:黑线(42脚)焊接到右侧(原来接的3脚),红线(41脚)焊接到左侧(原来接的2脚)。】
METHOD 2 方法2 The second method retains the 2 SMD resistors that areremoved in method 1, but instead 2 traces have to be cut. 这个方案使用原有两SMD电阻,但是需要在PCB上切断原有PCB线路, 【译者:本方法会导致无法恢复的PCB损伤,请谨慎决定。下面也不按他的翻译了,太繁琐,我自己解释下吧延下图黄色位置,将PCB上的两条铜线切断,注意一定确认切断,不能有搭线。】
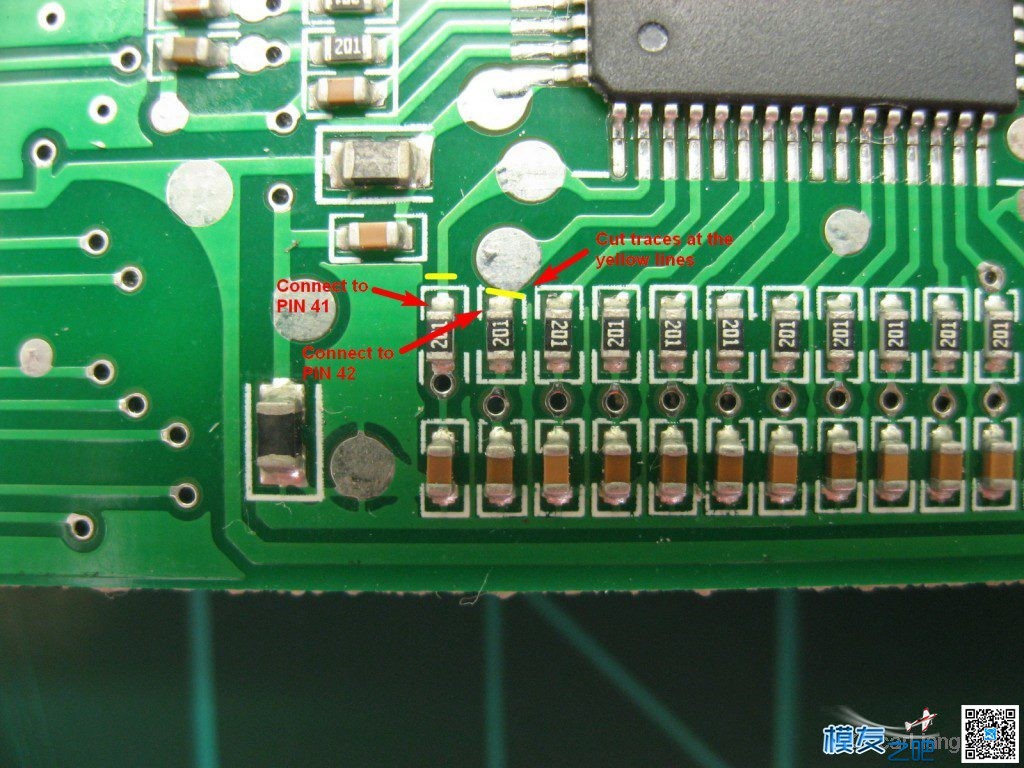
These traces are pretty small, so a steady hand and goodeye will be required! Use a #11 Blade hobby knife and a good magnifier. Onehard cut with the blade tip then one more with the back side of the tip makes agood cut and separation of pad and trace. With a sharp tipped iron pre tin theSMD resistor solder point, using leaded solder, since it melts at a lower temp. Use really fine single strand wire, for example the 36AWGteflon coated wire HobbyKing sells to connect the ends of the SMD resistorsdirectly (without the 220 Ohm resistors) to the processor pins 41 & 42 asshown in method 1. Pre tin the wire and do a fast on and off solder joint. Toomuch heat and the resistor may be damaged or fall off, which will also happenwith too large a tip or too high heat. The pre tinning should make it fast andeasy. Use a multimeter to ensure the SMD resistor is stilldisconnected from the pads when done. 【译者:然后用导线将41脚和42脚连接到下图位置,具体顺序和方法1 一样】
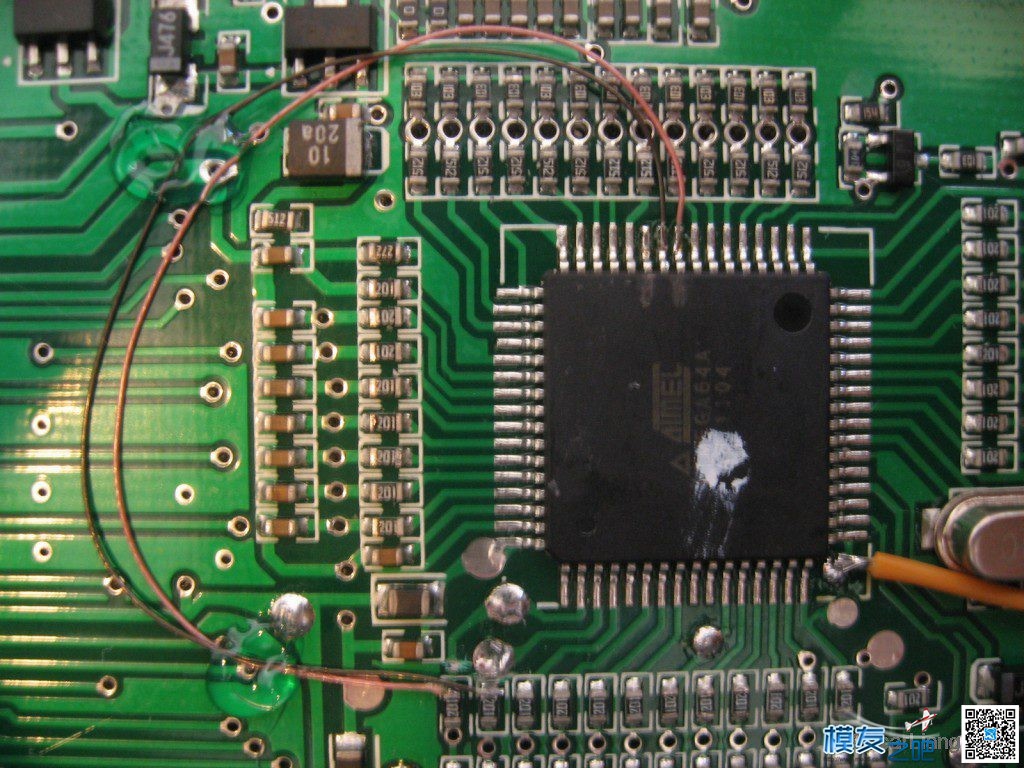
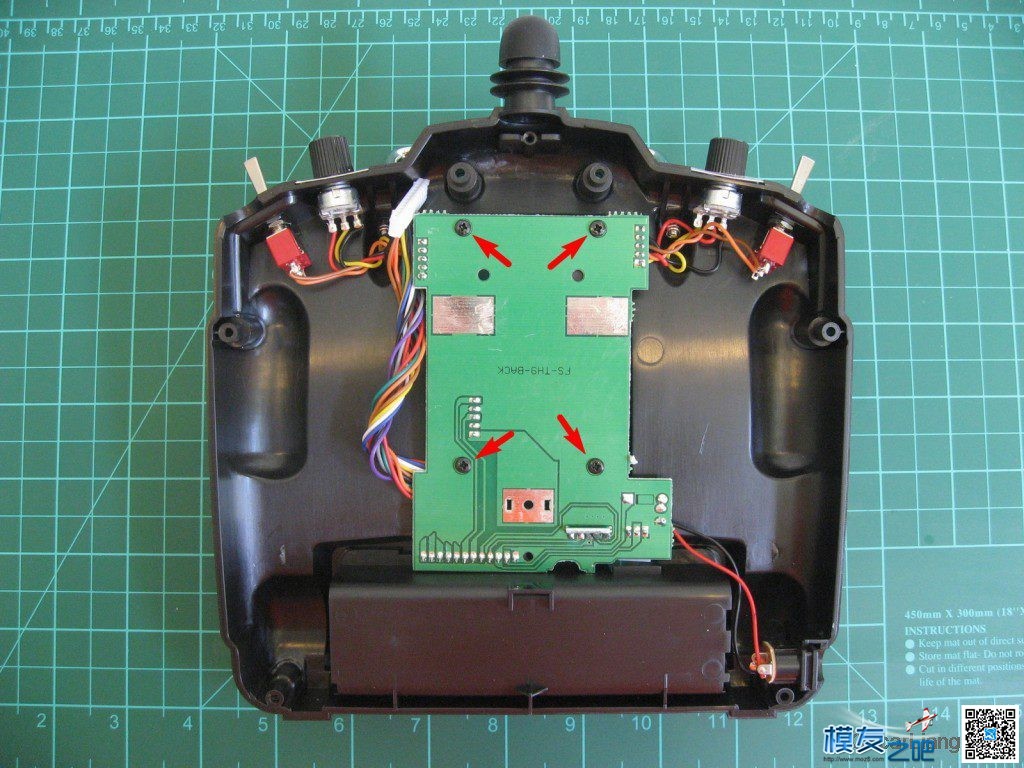
Connecting the FrSky module 连接高频头 Now we get to the first step of the second part of thismod. As we are using the unused pins 2 & 5 on the moduleconnector to send telemetry information to & from the FrSky module, thesepins must be isolated. Remove the rear PCB from the rear half of thetransmitter by taking out the 4 screws shown by the red arrows: 使用高频头借口上未使用的第2、5针脚将遥测数据引入到遥控器,首先,按下图松开4个螺钉。
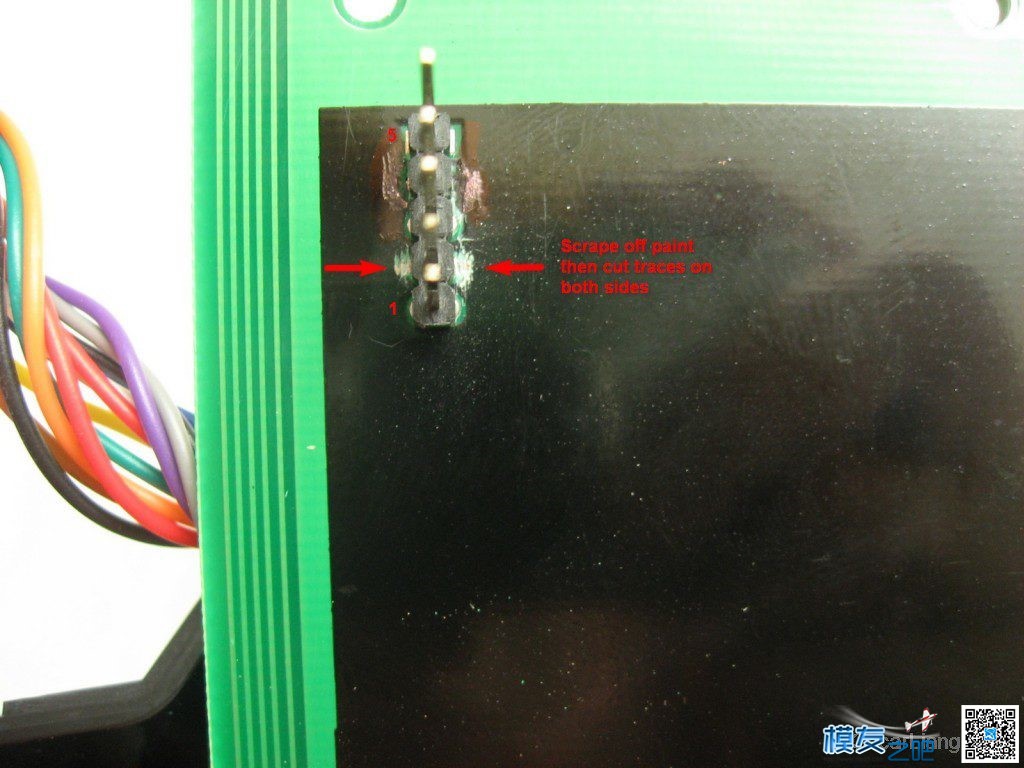
Locate pin 2 on the painted side of the rear PCB. You mayhave to scratch some of the paint away to see the traces, then cut the traceson both sides of the pin: 【译者:将2、5两个针脚(针脚好从上向下以此是1、2、3、4、5针脚),在PCB两面的连接铜线(其实已经是铜皮了)都切断,如下面图所示】
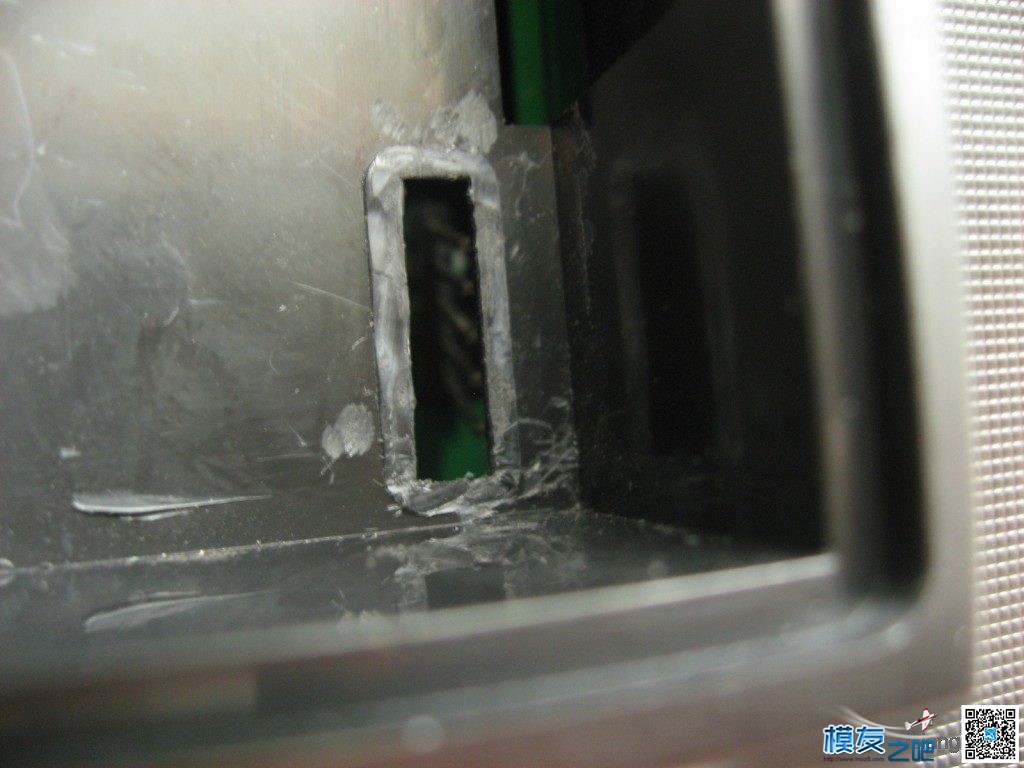
Before replacing the rear PCB, note that on the latest 9xtransmitters, there is a lip around the pins in the module bay, now would be agood time to remove this with a Dremel or similar, otherwise the FrSky DJTmodule wont fit. Replace the rear PCB when done. 9X遥控器JR接头有点特殊,需要吧高出来的塑料切掉,否则很多JR标准的高频头都不能很好的安装到遥控器里。
On the other side of the rear PCB, also cut the traces onboth sides of pin 2 and on one side of pin 5 as shown. It’s always a good ideato check the pins with a multimeter to ensure the traces have been fully cut. 和之前一样将2、5两个针脚连接铜线都切断,如下图。
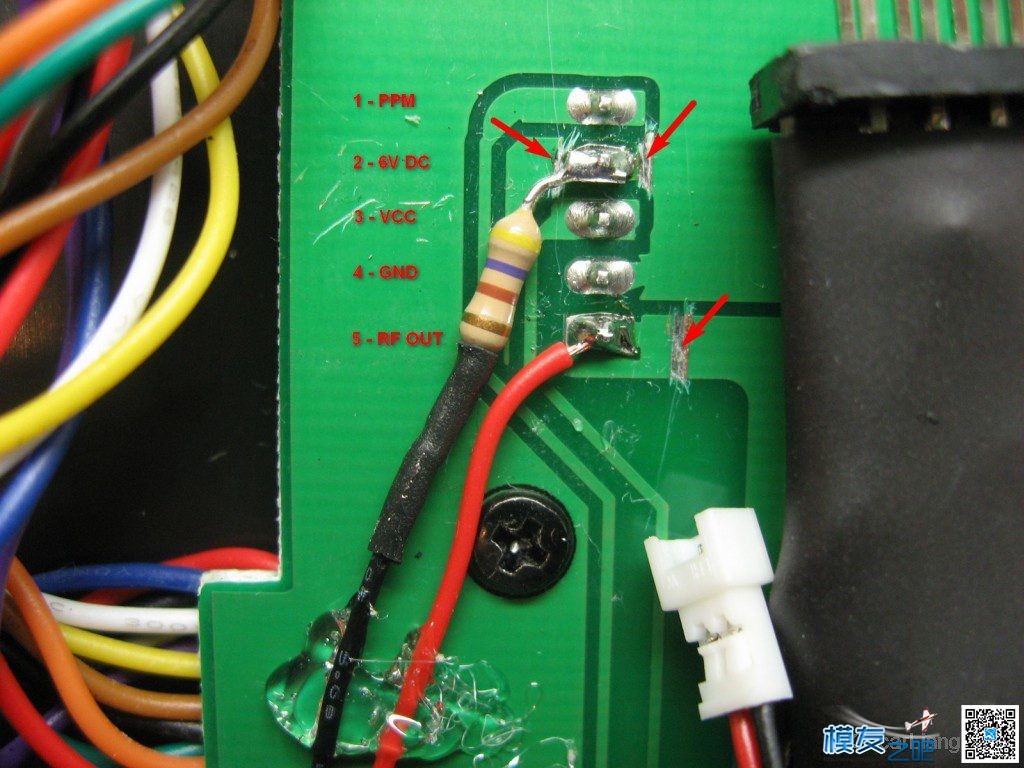
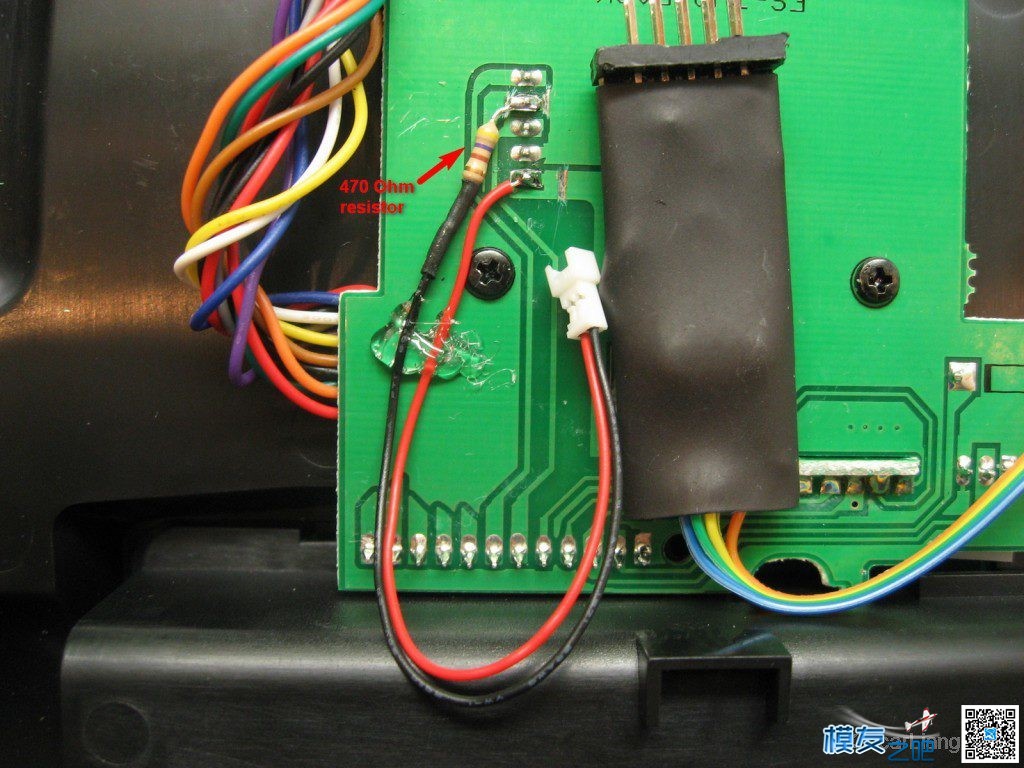
To complete the mod, solder a 470 Ohm resistor to pin 2,then connect the 2 wires that go to pins 2 & 3 on the ATmega64 processor: 马上就完成改线了,串接一个470欧电阻在接口2脚上,然后和5脚的接一起做一个接头,和主控侧的接头连接。
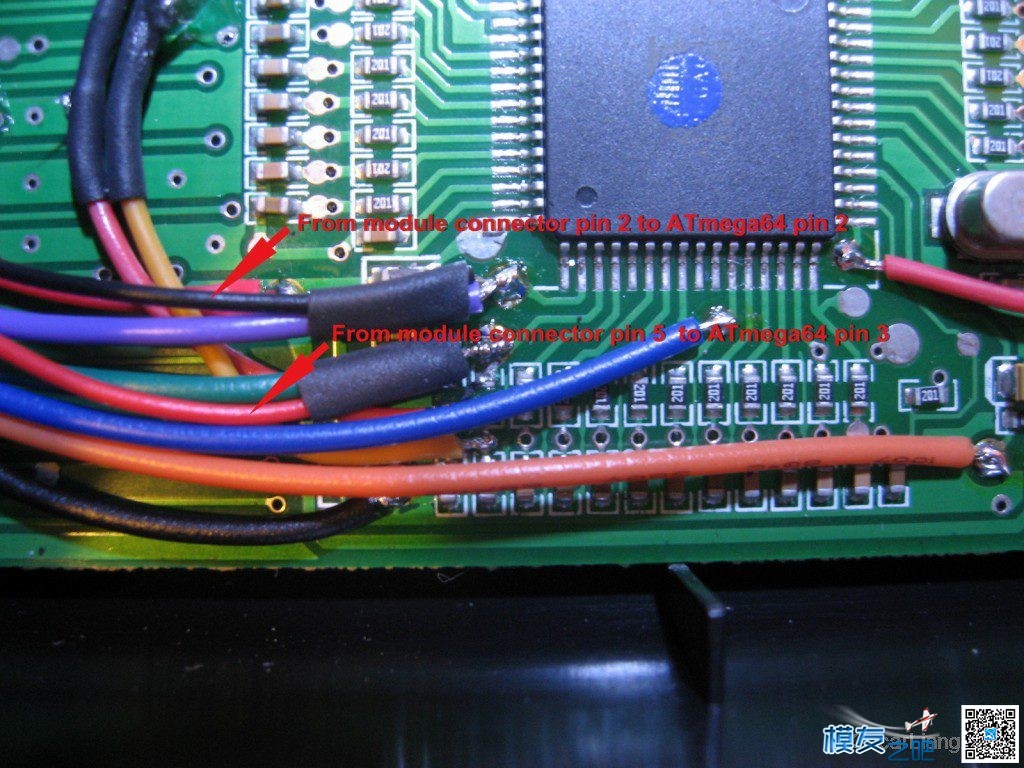
Processor connections shown below will be completedduring the programmer installation process: 刚才第一步两个方法,断开的和主控芯片2、3脚连接的焊盘,在这两个焊盘上焊接一个接头连接分别连接到高频头接口的2、5针脚(芯片2脚-接口2脚;芯片3脚-接口5脚)。 【译者:大家看到下图,在这两个焊盘上还焊了两根较粗的线(紫色和绿色线)和咱们的黑线和红线并联,这两粗线是用来刷机用的,请百度Th9x刷机教程。】
| 
 /1
/1 